- 2 images for displaying rating:
ratings.png

ratingsrtl.png

- 2 images for hovering/selecting rating (enlarged):
ratingsempty.png
ratingsnew.png
You can find these images in the 14 hive, images folder.
Make your custom icons (16×16), I prefer (the free) Paint.NET program. Just open the original icons, save them with another name and make your own of them.
How to change these images by SharePoint Designer

How to change these images by a feature
Create an empty SharePoint 2010 project with Visual Studio 2010 and add a site collection scoped feature.
Add a SharePoint Images Mapped folder and add your images to this folder. Note: Visual Studio adds a subfolder with the name of your project to your and SharePoint’s images are not messed up, nice!
Add an event receiver to your feature to set the properties of the images.
Uncomment the FeatureActivated method and add code:
SPSite site = properties.Feature.Parent as SPSite;
SPWeb web = site.RootWeb;
//preserver original ones
web.AllProperties[“ratings_imagestripurl_original”] = web.AllProperties[“ratings_imagestripurl”];
web.AllProperties[“ratings_newratingiconurl_original”] = web.AllProperties[“ratings_newratingiconurl”];
web.AllProperties[“ratings_emptyiconurl_original”] = web.AllProperties[“ratings_emptyiconurl”];
//set new ones
web.AllProperties[“ratings_imagestripurl”] = “_layouts/images/ITIdea.CustomRatings/RatingsFC.png”;
web.AllProperties[“ratings_newratingiconurl”] = “_layouts/images/ITIdea.CustomRatings/RatingsNewFC.png”;
web.AllProperties[“ratings_emptyiconurl”] = “_layouts/images/ITIdea.CustomRatings/RatingsEmptyFC.png”;
web.Update();
Uncomment the FeatureDeactivating method and add code:
SPSite site = properties.Feature.Parent as SPSite;�
SPWeb web = site.RootWeb;�
web.AllProperties[“ratings_imagestripurl”] = web.AllProperties[“ratings_imagestripurl_original”];�
web.AllProperties[“ratings_newratingiconurl”] = web.AllProperties[“ratings_newratingiconurl_original”];
web.AllProperties[“ratings_emptyiconurl”] = web.AllProperties[“ratings_emptyiconurl_original”];
web.AllProperties.Remove(“ratings_imagestripurl_original”);
web.AllProperties.Remove(“ratings_newratingiconurl_original”);
web.AllProperties.Remove(“ratings_emptyiconurl_original”);
web.Update();
Deploy and activate the feature and recycle the application pool.
The new custom rating icons are visible and ready to use!
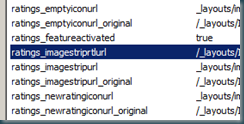
When you deployed the feature, check the Site Options in SharePoint Designer and you will see the original and newly added properties:

After deactivating the feature the original images are set again (and iisreset).

I seriously do not think I would be able to keep up with maintaining a site like it! Fantastic piece of work and I absolutely would like to see you keep up with it for a long time.
Thanks a good deal! I truly enjoyed reading this.Looking through these posts and the information you’ve provided I can appreciate that I still have a lot of things to learn. I will keep reading and keep re-visiting
Substantially, the article is really the sweetest on this deserving topic. I agree with your conclusions and will thirstily look forward to your incoming updates. Saying thanks will not just be sufficient, for the phenomenal clarity in your writing. I will at once grab your rss feed to stay informed of any updates. Admirable work and much success in your business dealings!
I recently came across your blog and have been reading along. I thought I would leave my first comment. I don’t know what to say except that I have enjoyed reading.